हाँ, सफेद बालों में भी बाल ट्रांसप्लांट किया जा सकता है। बालों का रंग (काला, सफेद, या ग्रे) ट्रांसप्लांट प्रक्रिया को प्रभावित नहीं करता। ट्रांसप्लांट के लिए जरूरी है कि डोनर एरिया (जहाँ से बाल लिए जाते हैं) में स्वस्थ और सक्रिय बाल मौजूद हों।
महत्वपूर्ण बातें:
बालों का रंग: ट्रांसप्लांट के बाद बाल उसी रंग में उगते हैं, जैसे वे डोनर एरिया में थे। अगर वे सफेद थे, तो वे सफेद ही रहेंगे।
प्रक्रिया: बालों का रंग ग्राफ्ट की गुणवत्ता और प्रक्रिया पर कोई असर नहीं डालता। बालों की जड़ (फॉलिकल) ही ट्रांसप्लांट की जाती है।
रंगाई का विकल्प: अगर आप सफेद बालों का रंग बदलना चाहते हैं, तो ट्रांसप्लांट के बाद उन्हें डाई या कलर किया जा सकता है।
यदि आप बालों के ट्रांसप्लांट में रुचि रखते हैं, तो किसी योग्य डर्मेटोलॉजिस्ट या हेयर ट्रांसप्लांट विशेषज्ञ से परामर्श करें।
Yes, hair transplant can also be done with grey or white hair. The color of the hair (black, white, or grey) does not affect the transplant process. The essential requirement is that the donor area (from where hair is taken) should have healthy and active hair.
Key Points:
Hair Color: After the transplant, the hair grows in the same color as it was in the donor area. If it was white or grey, it will remain so.
Process: The color of the hair does not impact the quality of the graft or the procedure. Only the hair follicle is transplanted.
Coloring Option: If you want to change the color of grey or white hair, it can be dyed or colored after the transplant.
If you are interested in hair transplantation, consult a qualified dermatologist or hair transplant specialist.
फ्लेक्सर टेंडन चोट उंगलियों में तब होती है जब उंगलियों को मोड़ने वाले टेंडन फट जाते हैं, कट जाते हैं या क्षतिग्रस्त हो जाते हैं। ये टेंडन आपके अग्रभाग की मांसपेशियों से होकर आपकी कलाई और हथेली से गुजरते हैं और उंगलियों की हड्डियों से जुड़ते हैं। ये टेंडन उंगलियों को मोड़ने और पकड़ने में मदद करते हैं।
कारण
लैसरेशन (कटने): गहरे कट से टेंडन कट सकता है।
क्रश चोटें: भारी मशीनरी या दरवाजों के कारण होने वाली क्षति।
खेल संबंधी चोटें: जैसे चढ़ाई करते समय जोर से पकड़ने या बल लगाने से टेंडन फट सकता है।
रूमेटॉइड आर्थराइटिस: टेंडन को कमजोर कर सकता है और अचानक फटने का कारण बन सकता है।
लक्षण
उंगलियों के जोड़ों को मोड़ने में असमर्थता।
हथेली या उंगली में दर्द, विशेष रूप से हिलाने पर।
सूजन, कोमलता या खरोंच के निशान।
चोट के दौरान “पॉपिंग” या झटका महसूस होना।
खुले घाव (यदि कटने से हुआ हो)।
निदान
चिकित्सक निम्नलिखित तरीकों से चोट का आकलन करेंगे:
शारीरिक परीक्षण: उंगली की सक्रिय और निष्क्रिय गति की जांच।
इमेजिंग: फ्रैक्चर को रोकने के लिए एक्स-रे या टिश्यू की जांच के लिए अल्ट्रासाउंड/एमआरआई।
विशेष परीक्षण: एफडीपी (फ्लेक्सर डिगिटोरम प्रौफुंडस) टेस्ट।
उपचार
चोट की गंभीरता और प्रकार के अनुसार उपचार किया जाता है:
गैर-सर्जिकल:
हल्की चोटों के लिए आराम, स्प्लिंटिंग और फिजिकल थेरेपी।
सर्जिकल:
टेंडन मरम्मत सर्जरी: पूरी तरह से फटे या कटे हुए टेंडन के लिए।
कार्यक्षमता बहाल करने और जटिलताओं (जैसे, स्कारिंग या टेंडन के सिकुड़ने) को रोकने के लिए जल्द से जल्द किया जाता है।
सर्जरी के बाद, टेंडन को सुरक्षित रखने के लिए एक कस्टम स्प्लिंट का उपयोग किया जाता है।
पुनर्वास
स्प्लिंटिंग: टेंडन को सुरक्षित स्थिति में रखने के लिए।
फिजिकल थेरेपी: ताकत और गति को पुनः प्राप्त करने के लिए।
पूरी तरह से ठीक होने में 6-12 सप्ताह लग सकते हैं, और थेरेपी 6 महीने तक जारी रह सकती है।
जटिलताएं
जकड़न या गति की कमी।
दाग ऊतक का बनना।
टेंडन का फिर से फटना।
यदि आपको फ्लेक्सर टेंडन चोट का संदेह है, तो तुरंत चिकित्सीय सहायता लें, क्योंकि समय पर उपचार से पूरी तरह ठीक होने की संभावना बढ़ जाती है।
A flexor tendon injury in the fingers occurs when the tendons that allow you to bend your fingers are torn, cut, or otherwise damaged. These tendons run from the muscles in your forearm through your wrist and palm, attaching to the bones in your fingers. They allow your fingers to flex and grip objects.
Causes
Lacerations: Deep cuts, often from sharp objects, can sever the tendon.
Crush injuries: Accidents involving heavy machinery or doors can damage the tendon.
Sports injuries: Forceful grabbing or twisting motions, such as in rock climbing, can tear the tendon.
Rheumatoid arthritis: Can weaken the tendons and lead to spontaneous rupture.
Symptoms
Inability to bend one or more joints of the finger.
Pain along the palm or finger, especially when trying to move.
Tenderness, swelling, or bruising in the affected area.
“Popping” or snapping sensation in the finger during injury.
Open wound (if caused by a laceration).
Diagnosis
A healthcare professional will assess the injury by:
Physical examination: Checking for active and passive finger movement.
Imaging: X-rays to rule out fractures, or ultrasound/MRI for soft tissue evaluation.
Special tests: Like the FDP (Flexor Digitorum Profundus) test to evaluate tendon function.
Treatment
Treatment depends on the severity and type of injury:
Non-Surgical
Minor injuries (e.g., inflammation) may be managed with rest, splinting, and physical therapy.
Surgical
Tendon repair surgery: For complete tears or lacerations.
Performed as soon as possible to restore function and prevent complications (e.g., scarring or retraction).
After surgery, a custom splint is typically used to protect the repair.
Rehabilitation
Splinting: Keeps the finger in a safe position to protect the tendon during healing.
Physical therapy: Gradual exercises to regain strength and motion.
Healing time varies but often requires 6-12 weeks of recovery, with ongoing therapy for up to 6 months.
Complications
Stiffness or loss of motion.
Scar tissue formation.
Re-tearing of the tendon if healing precautions are not followed.
If you suspect a flexor tendon injury, seek immediate medical attention, as early treatment improves the chances of a full recovery.
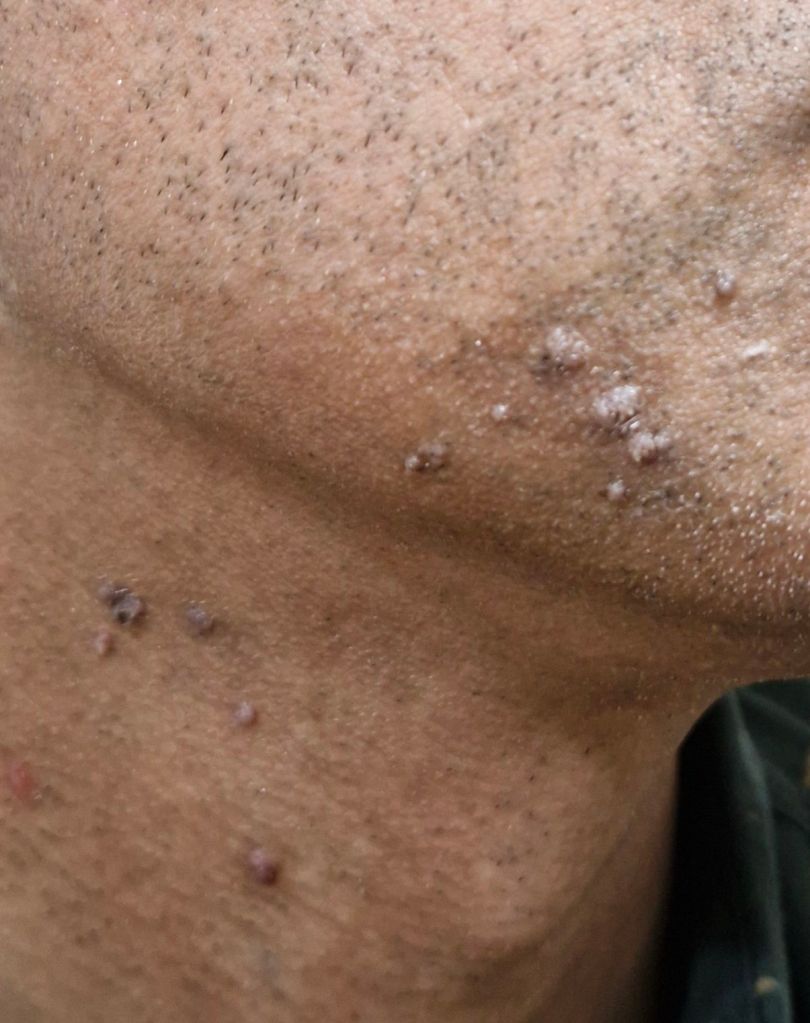
चेहरे के वायरल मस्से, जो ह्यूमन पैपिलोमावायरस (HPV) के कारण होते हैं, का इलाज करना चुनौतीपूर्ण हो सकता है क्योंकि चेहरे की त्वचा संवेदनशील होती है। उपचार का उद्देश्य मस्सों को हटाना और दाग-धब्बों या रंग परिवर्तन के जोखिम को कम करना है। यहां कुछ सामान्य उपचार विकल्प दिए गए हैं:
1. टॉपिकल उपचार
सैलिसिलिक एसिड: सैलिसिलिक एसिड युक्त ओवर-द-काउंटर उपचार का उपयोग किया जा सकता है, लेकिन आसपास की त्वचा को नुकसान या जलन से बचाने के लिए सावधानी बरतनी चाहिए।
रेटिनोइड्स: प्रिस्क्रिप्शन रेटिनोइड क्रीम (जैसे ट्रेटिनॉइन) मस्सों के विकास को रोकने में मदद कर सकती है।
इमिक्विमोड: यह प्रिस्क्रिप्शन क्रीम प्रतिरक्षा प्रणाली को वायरस से लड़ने के लिए प्रेरित करती है।
5-फ्लोरूरासिल: कभी-कभी जिद्दी मस्सों के लिए चिकित्सकीय देखरेख में उपयोग किया जाता है।
2. क्रायोथेरेपी
तरल नाइट्रोजन से मस्सों को फ्रीज करना प्रभावी हो सकता है। इसके लिए कई सत्रों की आवश्यकता हो सकती है, लेकिन स्वस्थ त्वचा को नुकसान से बचाने के लिए सावधानी बरतनी चाहिए।
3. इलेक्ट्रोसर्जरी और क्यूरेटेज
इस प्रक्रिया में मस्से को सुन्न करने के बाद स्क्रैप किया जाता है और ऊतक को नष्ट करने के लिए विद्युत प्रवाह का उपयोग किया जाता है। यह प्रभावी हो सकता है, लेकिन इससे दाग-धब्बे हो सकते हैं।
4. लेजर थेरेपी
पल्स्ड-डाई या CO2 लेजर जैसे लेजर मस्सों को लक्षित कर नष्ट कर सकते हैं। यह विधि जिद्दी या बड़े पैमाने पर फैले मस्सों के लिए उपयोगी है, लेकिन महंगी हो सकती है।
5. केमिकल पील्स
माइल्ड केमिकल पील्स (जैसे ट्राइक्लोरोएसिटिक एसिड – TCA) का उपयोग छोटे और सतही मस्सों के लिए किया जा सकता है।
6. इम्यूनोथेरेपी
एंटीजन या ब्लेमाइसिन जैसी दवाओं के इंजेक्शन प्रतिरक्षा प्रणाली को वायरस को लक्षित करने के लिए प्रेरित कर सकते हैं।
7. घरेलू उपचार
सेब का सिरका, लहसुन, या टी ट्री ऑयल का उपयोग फायदेमंद हो सकता है, लेकिन इन तरीकों का वैज्ञानिक समर्थन कमजोर है और ये संवेदनशील चेहरे की त्वचा को परेशान कर सकते हैं।
8. पर्यवेक्षण
कुछ मस्से स्वतः ठीक हो सकते हैं क्योंकि प्रतिरक्षा प्रणाली वायरस को खत्म कर देती है, खासकर बच्चों में। यह विधि छोटे और बिना लक्षण वाले मस्सों के लिए अधिक उपयुक्त है।
मुख्य बिंदु:
स्वयं उपचार से बचें: चेहरे के मस्सों का बिना चिकित्सकीय देखरेख के इलाज करने से दाग-धब्बे या समस्या बढ़ सकती है।
त्वचा रोग विशेषज्ञ से परामर्श करें: मस्सों के प्रकार, आकार और स्थान के आधार पर व्यक्तिगत उपचार के लिए त्वचा विशेषज्ञ से परामर्श करें।
रोकथाम के उपाय: मस्सों को छेड़ने से बचें, क्योंकि इससे वायरस फैल सकता है। अच्छी स्वच्छता बनाए रखें और व्यक्तिगत वस्तुओं को साझा करने से बचें।
क्या आप किसी विशेष उपचार के बारे में विस्तृत जानकारी चाहते हैं?
Facial viral warts, caused by the human papillomavirus (HPV), can be challenging to treat due to the sensitive nature of facial skin. Treatment aims to eliminate the warts while minimizing the risk of scarring or pigmentation changes. Here are some commonly used approaches:
Topical Treatments
Salicylic Acid: Over-the-counter treatments containing salicylic acid can be used, but care must be taken to avoid irritation or damage to surrounding skin.
Retinoids: Prescription retinoid creams (e.g., tretinoin) can help disrupt the growth of warts.
Imiquimod: A prescription cream that stimulates the immune system to fight the virus.
5-Fluorouracil: Occasionally used under medical supervision for resistant warts.
Cryotherapy
Freezing the warts with liquid nitrogen can be effective. Multiple sessions may be required, but care should be taken to minimize damage to healthy facial tissue.
Electrosurgery and Curettage
Involves scraping off the wart after numbing the area and applying electrical current to destroy tissue. This method can be effective but may leave scars.
Laser Therapy
Lasers (e.g., pulsed-dye or CO2 lasers) can target and destroy warts. They are particularly useful for stubborn or widespread warts but can be expensive.
Chemical Peels
Mild chemical peels with agents like trichloroacetic acid (TCA) may be used for small, superficial warts.
Immunotherapy
Intralesional injections of antigens or medications like bleomycin may stimulate the immune system to target the virus.
Home Remedies
Application of apple cider vinegar, garlic, or tea tree oil may help, but these methods lack strong scientific backing and can irritate sensitive facial skin.
Observation
Some warts may resolve spontaneously as the immune system clears the virus, especially in children. This approach is more viable for small, asymptomatic warts.
Key Considerations:
Avoid Self-Treatment: Treating facial warts without medical supervision can lead to scarring or worsening of the condition.
Dermatologist Consultation: Always consult a dermatologist for personalized treatment based on the type, size, and location of the warts.
Preventive Measures: Avoid picking at warts, as this can spread the virus. Maintain good hygiene and avoid sharing personal items.
Would you like detailed advice on any specific treatment?
Treatment options for varicose veins depend on the severity of the condition, symptoms, and personal preferences. They range from conservative measures to minimally invasive or surgical interventions. Here are the main options:
Compression Stockings: Help improve circulation and relieve symptoms like swelling and discomfort.
Elevation: Raising the legs above the heart reduces swelling and improves blood flow.
Weight Management: Maintaining a healthy weight can decrease pressure on the veins.
Avoid Prolonged Sitting or Standing: Frequent movement helps prevent blood pooling.
Non-Invasive and Minimally Invasive Treatments
Sclerotherapy: A solution is injected into the vein, causing it to close and fade over time. Ideal for smaller varicose veins.
Laser Treatment: Uses light energy to close off smaller varicose veins or spider veins.
Radiofrequency Ablation (RFA): A catheter delivers heat to close off larger veins.
Endovenous Laser Therapy (EVLT): A laser fiber is inserted into the vein to seal it shut.
Ambulatory Phlebectomy: Small incisions are made to remove superficial veins.
Surgical Procedures
Vein Stripping and Ligation: Involves removing or tying off the affected veins. Used for more severe cases.
Vein Bypass Surgery: Rarely performed and used for specific, severe cases.
Emerging Treatments
Cyanoacrylate Glue: A medical adhesive seals the vein.
Clarivein (MOCA): A combination of mechanical and chemical ablation.
When to See a Doctor
Consult a healthcare provider if:
You experience pain, swelling, or skin changes.
Home treatments are ineffective.
You have bleeding or ulcers near the veins.
A vascular specialist can assess your condition and recommend the most suitable treatment.
वैरिकोज वेन्स के उपचार विकल्प
वैरिकोज वेन्स के उपचार की आवश्यकता उनकी गंभीरता, लक्षणों और व्यक्तिगत प्राथमिकताओं पर निर्भर करती है। ये उपचार रूढ़िवादी उपायों से लेकर न्यूनतम इनवेसिव और सर्जिकल हस्तक्षेप तक हो सकते हैं। यहाँ मुख्य विकल्प दिए गए हैं:
1. जीवनशैली में बदलाव और स्व-देखभाल
व्यायाम: नियमित शारीरिक गतिविधि रक्त प्रवाह में सुधार करती है और नसों पर दबाव कम करती है।
कंप्रेशन स्टॉकिंग्स: रक्त परिसंचरण में सुधार करने और सूजन तथा असुविधा को कम करने में मदद करती हैं।
पैर उठाना: पैरों को हृदय से ऊपर उठाने से सूजन कम होती है और रक्त प्रवाह बेहतर होता है।
वजन प्रबंधन: स्वस्थ वजन बनाए रखना नसों पर दबाव कम कर सकता है।
लंबे समय तक बैठने या खड़े रहने से बचें: नियमित रूप से हलचल करने से रक्त जमने से बचा जा सकता है।
2. गैर-इनवेसिव और न्यूनतम इनवेसिव उपचार
स्क्लेरोथेरपी: नस में एक समाधान इंजेक्ट किया जाता है, जिससे यह बंद हो जाती है और समय के साथ गायब हो जाती है।
लेजर उपचार: हल्की ऊर्जा का उपयोग करके छोटी नसों या मकड़ी जैसी नसों को बंद किया जाता है।
रेडियोफ्रीक्वेंसी एब्लेशन (RFA): बड़ी नसों को बंद करने के लिए एक कैथेटर गर्मी प्रदान करता है।
एंडोवीनस लेजर थेरेपी (EVLT): नस में एक लेजर फाइबर डाला जाता है ताकि उसे सील किया जा सके।
एंबुलेटरी फ्लीबेक्टॉमी: सतही नसों को हटाने के लिए छोटे चीरे लगाए जाते हैं।
3. सर्जिकल प्रक्रियाएँ
नस स्ट्रिपिंग और लिगेशन: गंभीर मामलों में प्रभावित नसों को हटाने या बांधने की प्रक्रिया।
नस बाईपास सर्जरी: बहुत गंभीर मामलों के लिए दुर्लभ रूप से उपयोग की जाती है।
4. नवीन उपचार
साइनोएक्रिलेट गोंद: नस को सील करने के लिए एक चिकित्सा चिपकने वाला उपयोग किया जाता है।
क्लैरिवेन (MOCA): यांत्रिक और रासायनिक नस बंद करने का संयोजन।
डॉक्टर को कब दिखाएँ
डॉक्टर से परामर्श करें यदि:
आपको दर्द, सूजन, या त्वचा में बदलाव महसूस होता है।
घरेलू उपचार अप्रभावी हो।
नसों के पास रक्तस्राव या अल्सर हो।
एक संवहनी विशेषज्ञ या वेरिकोस वेन विशेषज्ञ आपकी स्थिति का मूल्यांकन कर सकते हैं और सबसे उपयुक्त उपचार की सिफारिश कर सकते हैं।
A beard hair transplant is a cosmetic procedure that helps achieve a fuller, well-defined beard by transplanting hair follicles, typically from the scalp, to areas of the face with sparse or uneven growth. It’s ideal for men looking to enhance their beard density or fill in patches.
Procedure Overview:
1. Consultation: A specialist evaluates your hair density, skin type, and discusses your goals.
2. Hair Extraction:
Follicular Unit Extraction (FUE): Individual hair follicles are removed from the donor area.
Follicular Unit Transplantation (FUT): A strip of skin with hair is removed, and follicles are harvested from it.
3. Hair Implantation: The harvested follicles are transplanted to the beard area, following the natural direction of hair growth.
4. Recovery:
Tiny scabs form around the transplanted hair and fall off within 1–2 weeks.
Full results typically appear after 6–12 months as the transplanted hair grows.
Benefits:
Permanent solution for patchy or thin beards.
Customizable shape and density.
Natural-looking results when performed by an experienced surgeon.
Beard Hair Transplant Cost:
The beard hair transplant cost typically ranges between ₹60,000 and ₹1,00,000, depending on the clinic, location, and the number of grafts required.
Beard Hair Transplant in Jabalpur:
If you’re looking for a beard hair transplant in Jabalpur, several clinics in the area specialize in this procedure. It’s important to choose a reputed clinic with experienced professionals to ensure optimal results and minimize risks.
Would you like help finding the best clinics in Jabalpur or understanding the procedure further?
दाढ़ी हेयर ट्रांसप्लांट एक कॉस्मेटिक प्रक्रिया है जो बालों के रोम (हेयर फॉलिकल्स) को आमतौर पर स्कैल्प से चेहरे के उन हिस्सों में ट्रांसप्लांट करने में मदद करती है, जहां बालों की वृद्धि कम या असमान होती है। यह उन पुरुषों के लिए आदर्श है जो अपनी दाढ़ी की घनत्व बढ़ाना या पैच भरना चाहते हैं।
प्रक्रिया का अवलोकन:
1. परामर्श: एक विशेषज्ञ आपकी बालों की घनत्व, त्वचा के प्रकार का मूल्यांकन करता है और आपके लक्ष्य पर चर्चा करता है।
2. बालों का निष्कर्षण:
फॉलिक्युलर यूनिट एक्सट्रैक्शन (FUE): डोनर क्षेत्र से व्यक्तिगत बालों के रोम हटाए जाते हैं।
फॉलिक्युलर यूनिट ट्रांसप्लांटेशन (FUT): त्वचा का एक पट्टी हटाई जाती है और उसमें से बालों के रोम निकाले जाते हैं।
3. बालों का प्रत्यारोपण: निकाले गए बालों के रोम दाढ़ी के क्षेत्र में प्रत्यारोपित किए जाते हैं, बालों की प्राकृतिक दिशा का पालन करते हुए।
4. रिकवरी:
प्रत्यारोपित बालों के आसपास छोटे-छोटे स्कैब बनते हैं और 1–2 सप्ताह के भीतर गिर जाते हैं।
पूर्ण परिणाम आमतौर पर 6–12 महीनों के भीतर दिखने लगते हैं, जब प्रत्यारोपित बाल बढ़ने लगते हैं।
लाभ:
पैची या पतली दाढ़ी का स्थायी समाधान।
आकार और घनत्व को कस्टमाइज़ किया जा सकता है।
एक अनुभवी सर्जन द्वारा किए जाने पर प्राकृतिक दिखने वाले परिणाम।
दाढ़ी हेयर ट्रांसप्लांट की कीमत:
दाढ़ी हेयर ट्रांसप्लांट की कीमत आमतौर पर ₹60,000 से ₹1,00,000 के बीच होती है, जो क्लिनिक, स्थान और आवश्यक ग्राफ्ट्स की संख्या पर निर्भर करती है।
जबलपुर में दाढ़ी हेयर ट्रांसप्लांट:
यदि आप जबलपुर में दाढ़ी हेयर ट्रांसप्लांट की तलाश कर रहे हैं, तो क्षेत्र में कई क्लीनिक हैं जो इस प्रक्रिया में विशेषज्ञता रखते हैं। सर्वोत्तम परिणाम प्राप्त करने और जोखिम कम करने के लिए एक प्रतिष्ठित क्लीनिक चुनना महत्वपूर्ण है।
क्या आप जबलपुर में सर्वश्रेष्ठ क्लीनिक खोजने या प्रक्रिया के बारे में और अधिक जानकारी चाहते हैं?
The density you can expect after a hair transplant depends on several factors, including the method used, the skill of the surgeon, the quality of your donor hair, and the size of the recipient area. On average:
1. Number of Grafts Transplanted
FUE (Follicular Unit Extraction): Around 30–45 grafts per square centimeter.
FUT (Follicular Unit Transplantation): Around 40–60 grafts per square centimeter.
A single graft typically contains 1–4 hairs, depending on its natural grouping.
2. Ideal Density Goals
Natural hair density is around 90–120 follicular units per square centimeter, but this level is often impractical in a transplant due to donor limitations.
Hair transplant surgeons aim to achieve a density of 35–60 follicular units per square centimeter to create a natural appearance.
3. Factors Affecting Results
Donor Area Quality: The density and health of hair in the donor area significantly influence the outcome.
Hair Characteristics: Thick, coarse, or curly hair can provide better coverage than fine, straight hair.
Size of the Balding Area: The larger the area to be covered, the more diluted the density will be unless you have a sufficient donor supply.
Surgeon’s Expertise: An experienced surgeon can optimize graft placement for a more natural and dense appearance.
4. Visual Impact
Hair transplants often focus on the frontal hairline and crown, as these are the most visible areas.
Full density restoration like natural hair isn’t always achievable, but skilled surgeons can create the illusion of density using strategic placement.
5. Final Results
Hair density improves over time as transplanted grafts grow. Full results typically take 12–18 months to be visible.
You may require multiple sessions if you have advanced hair loss and want higher density.
Consult with a qualified hair transplant specialist to understand your realistic expectations based on your individual hair characteristics and needs.
बाल प्रत्यारोपण (Hair Transplant) के बाद मिलने वाला घनत्व कई कारकों पर निर्भर करता है, जैसे इस्तेमाल की गई विधि, सर्जन की विशेषज्ञता, डोनर बालों की गुणवत्ता, और जिस क्षेत्र में बाल लगाए जाने हैं उसका आकार। सामान्यतः:
1. ग्राफ्ट्स की संख्या
FUE (Follicular Unit Extraction): लगभग 30–45 ग्राफ्ट प्रति वर्ग सेंटीमीटर।
FUT (Follicular Unit Transplantation): लगभग 40–60 ग्राफ्ट प्रति वर्ग सेंटीमीटर।
एक ग्राफ्ट में आमतौर पर 1–4 बाल होते हैं, जो उनके प्राकृतिक समूह पर निर्भर करता है।
2. आदर्श घनत्व का लक्ष्य
प्राकृतिक बालों का घनत्व लगभग 90–120 फॉलिकुलर यूनिट प्रति वर्ग सेंटीमीटर होता है, लेकिन डोनर की सीमितता के कारण यह प्रत्यारोपण में संभव नहीं है।
सर्जन आमतौर पर 35–60 फॉलिकुलर यूनिट प्रति वर्ग सेंटीमीटर का घनत्व प्राप्त करने का प्रयास करते हैं ताकि प्राकृतिक दिखने वाला परिणाम मिले।
3. परिणामों को प्रभावित करने वाले कारक
डोनर क्षेत्र की गुणवत्ता: डोनर क्षेत्र के बालों का घनत्व और स्वास्थ्य परिणामों को काफी हद तक प्रभावित करता है।
बालों की विशेषताएँ: मोटे, घुंघराले बाल पतले, सीधे बालों की तुलना में बेहतर कवरेज प्रदान करते हैं।
गंजेपन वाले क्षेत्र का आकार: जितना बड़ा क्षेत्र होगा, उतना ही घनत्व कम होगा जब तक कि पर्याप्त डोनर बाल उपलब्ध न हों।
सर्जन की विशेषज्ञता: एक अनुभवी सर्जन ग्राफ्ट को इस तरह से लगा सकता है कि परिणाम अधिक प्राकृतिक और घने लगें।
4. दृश्य प्रभाव
बाल प्रत्यारोपण अक्सर फ्रंटल हेयरलाइन और क्राउन पर केंद्रित होता है क्योंकि ये सबसे अधिक दिखाई देने वाले क्षेत्र होते हैं।
प्राकृतिक बालों की तरह पूरा घनत्व प्राप्त करना हमेशा संभव नहीं होता, लेकिन एक कुशल सर्जन रणनीतिक रूप से घनत्व का भ्रम पैदा कर सकता है।
5. अंतिम परिणाम
जैसे-जैसे लगाए गए बाल बढ़ते हैं, घनत्व समय के साथ बेहतर होता है। पूरी तरह से परिणाम देखने में 12–18 महीने लगते हैं।
यदि बालों का झड़ना अधिक है और आप उच्च घनत्व चाहते हैं, तो आपको कई सत्रों की आवश्यकता हो सकती है।
अपनी बालों की विशेषताओं और आवश्यकताओं के आधार पर यथार्थवादी अपेक्षाओं को समझने के लिए एक योग्य हेयर ट्रांसप्लांट विशेषज्ञ से परामर्श करें।
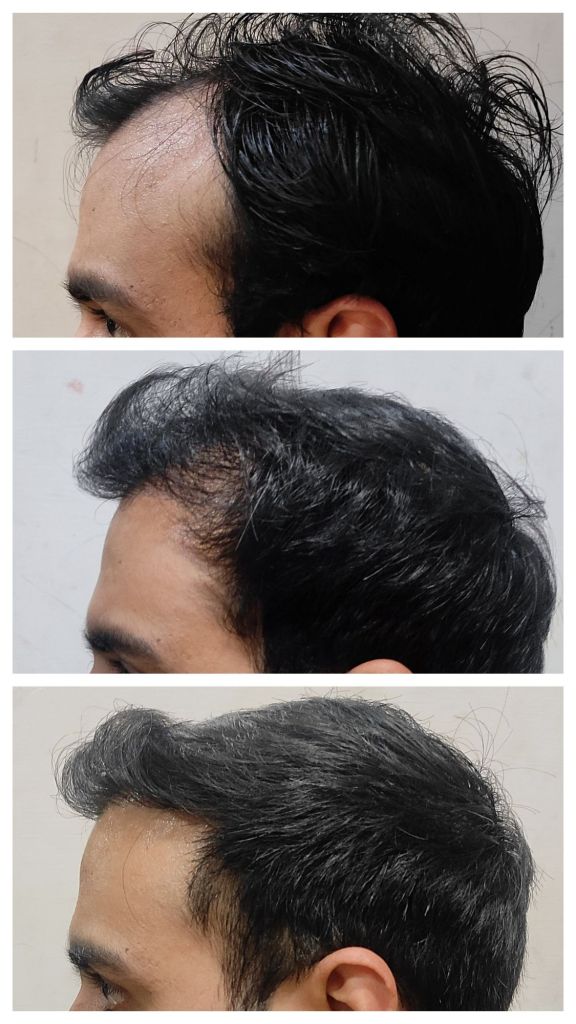
Dr. Sunit Nema, a renowned hair transplant surgeon based in Jabalpur, explains:
“After a hair transplant, patients can expect a gradual process of hair growth. In the first 2–3 weeks, the transplanted hair may shed due to the ‘shock loss’ phase, which is completely normal. By 1–3 months, new hair starts to grow, although it may initially appear thin and fine. Noticeable hair growth occurs between 4–6 months as the hair thickens and matures. By 12 months, patients typically see significant results, with the final density and texture becoming fully visible within 12–18 months. Each individual’s growth pattern may vary, but following proper post-operative care ensures optimal results.”
Dr. Nema emphasizes the importance of consulting a qualified surgeon for the best outcomes.
डॉ. सुनीत नेमा, जबलपुर के जाने-माने हेयर ट्रांसप्लांट सर्जन, बताते हैं:
“हेयर ट्रांसप्लांट के बाद बालों का बढ़ना एक धीमी और क्रमिक प्रक्रिया है। पहले 2-3 हफ्तों में ट्रांसप्लांट किए गए बाल झड़ सकते हैं, जिसे ‘शॉक लॉस’ कहा जाता है। यह पूरी तरह सामान्य है। 1-3 महीने के भीतर नए बाल उगने लगते हैं, जो शुरुआत में पतले और हल्के हो सकते हैं। 4-6 महीने के बीच बालों की वृद्धि स्पष्ट रूप से दिखने लगती है, और बाल घने और मजबूत होने लगते हैं। 12 महीने के भीतर मरीज को अच्छे परिणाम दिखने लगते हैं, और 12-18 महीनों में बालों की पूरी घनत्व और प्राकृतिक बनावट दिखाई देती है। हालांकि, हर व्यक्ति का बाल उगने का पैटर्न अलग हो सकता है, लेकिन सही पोस्ट-ऑपरेटिव देखभाल से बेहतरीन परिणाम मिलते हैं।”
डॉ. नेमा यह भी कहते हैं कि बेहतर परिणाम के लिए किसी योग्य सर्जन से परामर्श करना बेहद जरूरी है।
Varicose veins are enlarged, twisted veins that often occur in the legs due to weakened or damaged valves in the veins. They are graded based on their severity, often using the CEAP classification system (Clinical, Etiological, Anatomical, Pathophysiological). Treatment options depend on the grade and symptoms. Here’s an overview:
—
Grades of Varicose Veins and Treatment
1. Grade C0 (No visible/palpable signs)
Symptoms: Leg heaviness, fatigue, or mild discomfort without visible varicose veins.
Treatment: Lifestyle changes (exercise, leg elevation, weight management), compression stockings.
2. Grade C1 (Telangiectasia/Spider Veins or Reticular Veins)
Symptoms: Fine, red/purple spider veins or small blue reticular veins, often cosmetic concerns.
Treatment:
Sclerotherapy: Injection of a solution to close the veins.
Laser therapy: Non-invasive light treatment to fade veins.
3. Grade C2 (Visible Varicose Veins)
Symptoms: Enlarged, bulging veins visible on the skin. Possible mild discomfort or aching.
1. Endovenous Laser Therapy (EVLT): Uses laser heat to close off varicose veins.
2. Radiofrequency Ablation (RFA): Similar to EVLT but uses radiofrequency energy.
3. Sclerotherapy: Injects a solution to close small varicose or spider veins.
4. Surgical Options:
Vein Stripping and Ligation: Removal of large varicose veins.
Phlebectomy: Removal of surface veins through tiny incisions.
Consultation with a vascular surgeon or specialist is essential for a personalized treatment plan. Early intervention prevents complications like ulcers or deep vein thrombosis (DVT).
वेरीकोज वेन्स: परिचय और उपचार
वेरीकोज वेन्स फूली हुई, मुड़ी हुई नसें होती हैं, जो अक्सर पैरों में कमजोर या क्षतिग्रस्त वाल्व के कारण होती हैं। इन्हें उनकी गंभीरता के आधार पर CEAP वर्गीकरण प्रणाली (Clinical, Etiological, Anatomical, Pathophysiological) का उपयोग करके वर्गीकृत किया जाता है। उपचार विकल्प ग्रेड और लक्षणों पर निर्भर करते हैं।
—
वेरीकोज वेन्स के ग्रेड और उनका उपचार
1. ग्रेड C0 (कोई दृश्य या महसूस करने योग्य लक्षण नहीं)
लक्षण: पैरों में भारीपन, थकावट, या हल्का असुविधा लेकिन नसें दिखाई नहीं देतीं।
उपचार: जीवनशैली में बदलाव (व्यायाम, पैरों को ऊंचा रखना, वजन प्रबंधन), कंप्रेशन स्टॉकिंग्स।
2. ग्रेड C1 (स्पाइडर वेन्स या रेटिकुलर वेन्स)
लक्षण: बारीक, लाल/बैंगनी रंग की स्पाइडर वेन्स या नीली रेटिकुलर वेन्स। आमतौर पर सौंदर्य से संबंधित समस्या।
उपचार:
स्क्लेरोथेरेपी: नसों को बंद करने के लिए एक समाधान का इंजेक्शन।
लेजर थेरेपी: नसों को हल्का करने के लिए गैर-आक्रामक प्रकाश उपचार।
3. ग्रेड C2 (दृश्य वेरीकोज वेन्स)
लक्षण: त्वचा पर दिखाई देने वाली बड़ी, उभरी हुई नसें। हल्की असुविधा या दर्द हो सकता है।
एंबुलेटरी फ्लेबेक्टॉमी: त्वचा पर छोटे चीरे से नसों को हटाना।
4. ग्रेड C3 (त्वचा में बदलाव के बिना सूजन)
लक्षण: नसों की कमजोरी के कारण पैरों या टखनों में सूजन।
उपचार:
कंप्रेशन स्टॉकिंग्स।
चिकित्सकीय प्रबंधन: नसों की कमजोरी को ठीक करने के लिए EVLT या RFA।
जीवनशैली में बदलाव।
5. ग्रेड C4 (त्वचा में बदलाव)
लक्षण: त्वचा का रंग बदलना (भूरा धब्बा), एक्जिमा, या त्वचा का मोटा होना (लिपोडर्माटोस्क्लेरोसिस)।
उपचार:
चिकित्सा प्रक्रियाएं (EVLT, RFA, या सर्जरी)।
त्वचा की देखभाल: एक्जिमा के लिए टॉपिकल क्रीम, मॉइस्चराइज़र।
कंप्रेशन थेरेपी।
6. ग्रेड C5 (ठीक हुआ नस संबंधी घाव)
लक्षण: एक ठीक हुआ नस संबंधी घाव, जिसमें निशान दिखते हैं।
उपचार:
निरंतर कंप्रेशन थेरेपी।
नसों की कमजोरी को ठीक करने के लिए चिकित्सकीय या सर्जिकल हस्तक्षेप।
7. ग्रेड C6 (सक्रिय नस संबंधी घाव)
लक्षण: खुला घाव या अल्सर, आमतौर पर टखने के पास।
उपचार:
मल्टीलेयर कंप्रेशन पट्टियां या स्टॉकिंग्स।
घाव की देखभाल (ड्रेसिंग, संक्रमण होने पर एंटीबायोटिक्स)।
नसों का अंतिम उपचार: RFA, EVLT, या सर्जरी।
—
जीवनशैली और रोकथाम उपाय
रक्त प्रवाह में सुधार के लिए नियमित व्यायाम।
लंबे समय तक खड़े रहने या बैठने से बचें।
सूजन को कम करने के लिए पैरों को ऊंचा रखें।
स्वस्थ वजन बनाए रखें।
—
उन्नत उपचार विकल्प (यदि पारंपरिक उपाय विफल हों)
1. एंडोवेनस लेजर थेरेपी (EVLT): लेजर गर्मी का उपयोग कर नसों को बंद करना।
2. रेडियोफ्रीक्वेंसी एब्लेशन (RFA): EVLT के समान, लेकिन इसमें रेडियोफ्रीक्वेंसी ऊर्जा का उपयोग होता है।
3. स्क्लेरोथेरेपी: नसों या स्पाइडर वेन्स को बंद करने के लिए एक समाधान का इंजेक्शन।
4. सर्जिकल विकल्प:
वेइन स्ट्रिपिंग और लिगेशन: बड़ी वेरीकोज नसों को हटाना।
फ्लेबेक्टॉमी: त्वचा पर छोटे चीरे से सतही नसों को हटाना।
—
विशेषज्ञ से परामर्श
वेरीकोज वेन्स के उपचार के लिए व्यक्तिगत योजना बनाने के लिए जबलपुर में वेरीकोज वेन्स डॉक्टर से परामर्श करें। समय पर उपचार से अल्सर या डीप वेन थ्रॉम्बोसिस (DVT) जैसे जटिलताओं को रोका जा सकता है।
डूटास्टराइड का उपयोग बालों के झड़ने (एंड्रोजेनेटिक एलोपेशिया) के लिए किया जाता है, और इसे लंबे समय तक लिया जा सकता है, बशर्ते इसे सहन किया जा सके और डॉक्टर द्वारा निर्धारित किया गया हो। उपचार की अवधि व्यक्ति की प्रतिक्रिया और डॉक्टर की सलाह पर निर्भर करती है। नीचे कुछ मुख्य बातें दी गई हैं:
1. नियमितता और निगरानी: डूटास्टराइड के प्रभाव को बनाए रखने के लिए इसे लगातार लेना आवश्यक होता है। दवा बंद करने पर बालों का झड़ना फिर से शुरू हो सकता है।
2. परिणाम देखने का समय: बालों की वृद्धि में सुधार दिखने में आमतौर पर 3–6 महीने लगते हैं, और अधिकतम परिणाम 12–18 महीनों में दिखाई देते हैं।
3. दीर्घकालिक उपयोग: कई लोग डूटास्टराइड को वर्षों तक बिना किसी समस्या के लेते हैं। हालांकि, दीर्घकालिक सुरक्षा और साइड इफेक्ट्स की नियमित रूप से डॉक्टर से समीक्षा करानी चाहिए।
4. साइड इफेक्ट्स पर निगरानी: डूटास्टराइड से कुछ लोगों में कामेच्छा में कमी, स्तंभन दोष, या गाइनेकोमास्टिया जैसे साइड इफेक्ट्स हो सकते हैं। यदि साइड इफेक्ट्स दिखाई दें, तो डॉक्टर से संपर्क करें।
5. डूटास्टराइड बंद करना: यदि आप दवा लेना बंद करते हैं, तो जो बाल
Dutasteride is commonly prescribed for hair loss (androgenetic alopecia) as an off-label use. It can be taken long-term, provided it is well-tolerated and prescribed by a healthcare professional. The duration of treatment depends on individual response and the doctor’s recommendations, but here are key points:
1. Consistency and Monitoring: Dutasteride often needs to be taken continuously to maintain its effects. Hair loss may resume if the medication is stopped.
2. Time to See Results: It usually takes 3–6 months to see noticeable improvements in hair growth, with optimal results appearing after 12–18 months.
3. Long-term Use: Many people take dutasteride for years without issues. However, long-term safety and side effects should be regularly reviewed with a doctor.
4. Monitoring Side Effects: Dutasteride can cause side effects such as decreased libido, erectile dysfunction, or gynecomastia in some individuals. If side effects occur, consult your doctor.
5. Stopping Dutasteride: If you stop taking the medication, the hair that was maintained or regrown may be lost over time.
Always consult a healthcare professional before starting or stopping dutasteride, and for ongoing monitoring during its use.
चेहरे की पिग्मेंटेशन, जैसे कि डार्क स्पॉट्स या असमान त्वचा टोन, को प्राकृतिक उपायों से ठीक किया जा सकता है। हालांकि, ये उपाय धीरे-धीरे काम करते हैं और पिग्मेंटेशन को पूरी तरह से हटाने में सक्षम नहीं हो सकते। यहां कुछ प्राकृतिक उपाय दिए गए हैं:
1. एलोवेरा इसमें एलोइन होता है, जो पिग्मेंटेशन को हल्का कर सकता है। कैसे उपयोग करें: ताजा एलोवेरा जेल को रात में प्रभावित क्षेत्र पर लगाएं और सुबह धो लें।
2. नींबू का रस विटामिन सी से भरपूर, जो त्वचा को उज्ज्वल करता है। कैसे उपयोग करें: बराबर मात्रा में नींबू का रस और पानी मिलाकर 10-15 मिनट के लिए लगाएं, फिर धो लें। (संवेदनशील त्वचा के लिए उपयुक्त नहीं और सीधे धूप में जाने से बचें)।
3. हल्दी इसमें करक्यूमिन होता है, जो एंटी-इंफ्लेमेटरी और एंटीऑक्सीडेंट है, और पिग्मेंटेशन को कम कर सकता है। कैसे उपयोग करें: हल्दी पाउडर को दूध या दही के साथ मिलाकर पेस्ट बनाएं और 10-15 मिनट के लिए लगाएं, फिर धो लें।
4. आलू इसमें एंजाइम होते हैं, जो डार्क स्पॉट्स को हल्का कर सकते हैं। कैसे उपयोग करें: कच्चे आलू का एक टुकड़ा पिग्मेंटेशन पर रगड़ें, 10 मिनट के लिए छोड़ दें, फिर धो लें।
5. सेब का सिरका (ACV) इसमें एसिटिक एसिड होता है, जो पिग्मेंटेशन को हल्का कर सकता है। कैसे उपयोग करें: बराबर मात्रा में ACV और पानी मिलाकर 5 मिनट के लिए लगाएं, फिर धो लें।
6. ग्रीन टी एंटीऑक्सीडेंट से भरपूर, जो मेलेनिन उत्पादन को कम कर सकता है। कैसे उपयोग करें: गर्म पानी में ग्रीन टी बैग को भिगोकर ठंडा करें और इसे कॉटन बॉल से त्वचा पर लगाएं।
7. खीरा त्वचा को शांत करता है और डिसकलरेशन को कम कर सकता है। कैसे उपयोग करें: खीरे का रस या टुकड़े पिग्मेंटेड क्षेत्र पर 15 मिनट के लिए लगाएं, फिर धो लें।
8. चंदन यह त्वचा को हल्का करने के लिए जाना जाता है। कैसे उपयोग करें: चंदन पाउडर को गुलाब जल के साथ मिलाकर पेस्ट बनाएं और 10-15 मिनट के लिए लगाएं।
9. पपीता इसमें पपेन जैसे एंजाइम होते हैं, जो एक्सफोलिएट करते हैं और पिग्मेंटेशन को हल्का करते हैं। कैसे उपयोग करें: पके हुए पपीते को मैश करके 20 मिनट के लिए मास्क के रूप में लगाएं, फिर धो लें।
10. सूरज से बचाव पिग्मेंटेशन को रोकने और त्वचा की सुरक्षा के लिए रोजाना सनस्क्रीन का उपयोग करें।
सावधानियां:
हमेशा पहले पैच टेस्ट करें।
नींबू या ACV जैसे कठोर तत्वों से बचें यदि त्वचा संवेदनशील हो।
परिणाम में हफ्तों या महीनों का समय लग सकता है। निरंतरता बनाए रखें।
यदि पिग्मेंटेशन बढ़ता है या बना रहता है, तो किसी त्वचा विशेषज्ञ से सलाह लें।
Facial pigmentation, such as dark spots or uneven skin tone, can be treated with natural remedies. However, these treatments work gradually and may not completely remove pigmentation. Here’s a list of natural remedies you can try:
Aloe Vera
Contains aloin, which may lighten pigmentation.
How to use: Apply fresh aloe vera gel to the affected area before bedtime and rinse off in the morning.
Lemon Juice
Rich in vitamin C, which helps brighten skin.
How to use: Mix equal parts lemon juice and water, apply to the pigmented area for 10-15 minutes, then rinse off. (Do not use if you have sensitive skin or plan to go into the sun immediately after).
Turmeric
Contains curcumin, an anti-inflammatory and antioxidant that may reduce pigmentation.
How to use: Mix turmeric powder with milk or yogurt to form a paste, apply for 10-15 minutes, then rinse off.
Potato
Contains enzymes that may lighten dark spots.
How to use: Rub a slice of raw potato on the pigmented area, leave for 10 minutes, then rinse off.
Apple Cider Vinegar
Contains acetic acid, which may help lighten pigmentation.
How to use: Mix equal parts ACV and water, apply for 5 minutes, then rinse off.
Green Tea
Rich in antioxidants, which may reduce melanin production.
How to use: Steep a green tea bag in hot water, let it cool, and apply it to the skin with a cotton ball.
Cucumber
Soothes skin and may reduce discoloration.
How to use: Apply cucumber juice or slices to the pigmented areas for 15 minutes, then rinse off.
Sandalwood
Known for its skin-lightening properties.
How to use: Make a paste with sandalwood powder and rose water, apply for 10-15 minutes, then rinse off.
Papaya
Contains enzymes like papain that exfoliate and lighten pigmentation.
How to use: Mash ripe papaya and apply it as a mask for 20 minutes, then rinse off.
Sun Protection
Wear sunscreen daily to prevent further pigmentation and protect your skin.
Precautions:
Always do a patch test to check for allergic reactions.
Avoid harsh ingredients like lemon or ACV if you have sensitive skin.
Results may take weeks to months; consistency is key.
If pigmentation persists or worsens, consult a skin specialist for professional advice.